Knife Care and Maintenance
Congratulations on your new knife!
However you’ve made your way here, you want to know how to get the most out of your new blade. If you never did a thing to take care of your knife, it might last a long time, but if you keep up with pocket knife maintenance, it could last a lifetime.
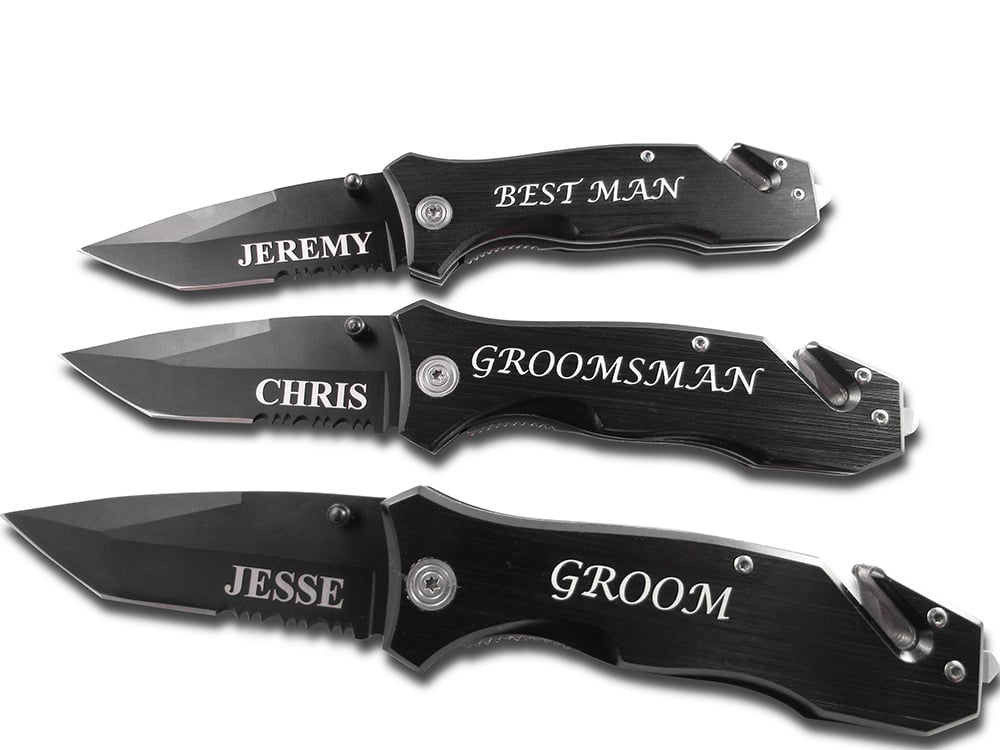
Whether your personalized pocket knife was a wedding party gift, a birthday present, or a personal purchase, you want to get your money’s worth, and we’re here to help. Immediately below, you’ll find some quick tips and tricks to get you started. If you want to dig deeper on a given subject, check out the directory and you’ll be on your way. Thank you for choosing LazerDesigns.com for your personalized knife needs.
How To disassemble a pocket knife for thorough maintenance
– To open: Every knife will vary, but many have a thumb stud that will assist opening. Open it carefully the first few times, until you’re familiar with how your knife works. If there’s no thumb stud, look for a groove or a hole that might do the same job.
– To close: Again, many knives very, but a locking mechanism is common on folding knives to keep them from closing on you when you use your knife to cut. To close your knife, you may need to find the lever that will unlock it. The lever is commonly found at the base of the blade, or the spine of the handle, or at the base of the open blade.
– Keep your knife clean. For more on how to go about this, see our Cleaning Guide
– Keep your knife oiled. This is important for all knives, but particularly good for folding blades. They have moving parts that could corrode with heavy use. Your main worry with fixed blade knives will be in preventing rust. If you’re not sure which type of knife you have, check out Types of Knives to learn more.
– Keep your knife sharp. If your knife has gone dull and you’re not sure how to get started, check out our introductory Sharpening Guide.
– Contrary to popular opinion, a dull knife is not safer than a sharp one. A dull blade will be more erratic when in use, meaning it is more likely to slip from the object to be cut and slice your fingers
– If you are using a folding knife, make sure to lock it all the way open before use. It should make a satisfying clicking sound.
– When cutting something open, grasp the knife firmly in your dominant hand and hold the object to be cut in your other hand. I usually have the best results when I put what I want to cut on a table so that I can exert downward pressure. Remember to always cut AWAY from your body (this includes your fingers!).
– NEVER try to pry with your blade. Most knives aren’t designed for that, and it could break the tip off, causing injury and ruining your lovely new knife. Always use the right tool for the right job.
Did you order the Survival Rescue Knife? Here’s a video with how to get the flashlight on:
How to Clean a Pocket Knife
Like any tool, your knife may get dirty with use. If your blade is grimy and rusty, don’t lose hope, we will tell you how to remove rust from pocket knives. You can keep your knife in stellar condition with regular cleaning.
To get it clean, you’ll need the following materials:
- A sturdy pair of rubber gloves
- Household lubricant (like WD-40)
- Oil (3-in-1)
- Mild dish soap
- A soft sponge or toothbrush
- A soft cleaning cloth
- A nylon pad
Step 1:
Put your gloves on. They can protect your hands from getting cut, and the oils and cleaners you use to clean your knife may cause skin irritation.
Step 2:
Open the knife all the way. If your knife has multiple tools, open them all, too.
Step 3:
Use a cloth to wipe down both sides of the blade with warm water.
Step 4:
Take your sponge and dish soap, and scrub the blade again. For serrated (sawtooth-like) blades, a toothbrush may work better. For stubborn spots, trying letting it the soap sit on the stain for a short time and then scrub again. DO NOT soak the knife for a long period of time.
Step 5:
To get any rust, spray your WD-40 (or other lubricant) onto the blade. Let it sit for a minute, then scrub with your nylon pad.
Step 6:
Once the rust is removed, wash again with warm, soapy water.
Step 7:
Dry off the knife with a soft cleaning cloth.
Step 8:
Add a few drops of household oil (3-in-1) to the blade.
***PLEASE BE CAREFUL*** through the entire process. Even with a good pair of rubber gloves, it is still important to follow knife safety rules.
How to Sharpen a Pocket Knife
Over time your blade will likely begin to wear out. Depending on how often you use it and what you use it for, this could be as extreme as nicks on the blade and as simple as a dull edge. Either way, there’s no need to throw the knife away. A little sharpening can get it usable again without too much trouble.
There are are a number of ways to sharpen a blade. I am going to briefly cover four of the most popular methods. These methods require great care and precision, as you can ruin your knife if you do it poorly. Sharpening involves removing a small amount of metal in order to expose a sharp edge, so you must make sure you don’t remove more or less than what is needed.
- Sharpening Rods
Sometimes flat, sometimes rounded, a sharpening rod can be made of a few different materials, including steel, stone, ceramic and diamond. You will run the blade along the rod at a 20 degree angle going from the left side to the right side 30-40 times.
Kitchen knife sets often come with a plain steel rod. This is more for alignment purposes (straightening the blades) than sharpening and won’t remove any metal.
- Water Stone
A similar concept to the sharpening rod. You will run the knife along the stone at an angle several times. The stone must be soaked in water prior to use, and kept wet throughout the sharpening. This is the most difficult method, but experts consider it one of the best ways to maintain a knife edge.
- Sharpening stone
A hybrid between the rod and the water stone, a third option is a smaller sharpening stone. They’re often made of various materials like the rods. Honing fluid or water is sometimes recommended. This option has the benefit of portability going for it more than anything else.
- Accusharp
This method is the easiest, but must be used carefully as it will remove more metal than conventional methods. The Accusharp is a little device that you will pull the knife through several times, allowing it to do the sharpening for you. This is a nice alternative to electric sharpeners or power grinders, neither of which are good options as they can ruin your knife and void your warranty. There are other devices that do the same thing, but Accusharp seems to be considered the most reliable.
This is an introduction into sharpening and is not intended to be a thorough guide. For a more in-depth look at sharpening, I’ve included a few links below that will help you get started on your own. If you aren’t one hundred percent confident going into sharpening your knife blade, you can pay a sharpening service to do it. Some manufacturers such as Buck and Spyderco will sharpen their own brand knives for you for a modest fee.
A few other things to consider:
– There are many kinds of sharpeners with different levels of grinding power or “grit”. Which one you need will depend on the type of knife you are sharpening, and what condition the blade is in. A course grit is better for major flaws and nicks, while a finer, medium grit is best for knives that have simply gone dull. Depending on the knife, you may need more than one type of grit to get the job done.
– Serrated blades hold their edge longer, but require special considerations when being sharpened
– Gut hooks also need to be sharpened
– One trick you can use is to shade in the bevel of the knife with a black marker. When you sharpen, the black should be gone from the edge. If you can still see the mark, your angle is most likely off.
Buck’s Sharpening Guide
Accusharp on Amazon.com
Sharpening via a water stone
Types of Knives and Blades
Confused about all the different kinds of knives and blade types? Here’s a list of some of the more common types of knives.
Clip point: Similar to the drop point, but the spine is concave
Drop Point Blade: A sloping, rounded blade style
Fixed Blade: A knife that does not fold up. These usually come with a sheath to protect the blade and its owner.
Folding: A knife with a mechanism where the blade can fold into the handle. Also known as a pocket knife.
Gut Hook: A hook that juts backward from the tip of the knife. Used for game and fishing to deal with entrails.
Hawkbill: A curving blade style resembling a bird of prey’s beak
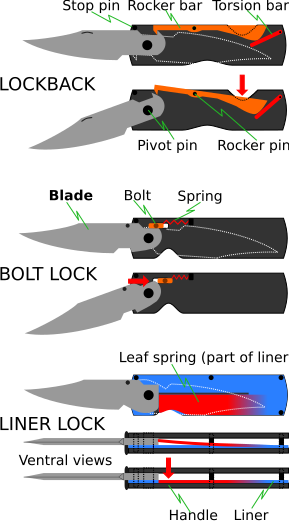
Liner Lock: A folding knife with a locking mechanism at the base of the blade, located just inside the handle. When pressed, it will allow the blade to unlock for closing.
Lockback: A folding knife with a locking mechanism in the spine of the handle. A lever, when pushed, will unlock the blade.
Needle Point: Similar to the Spear, but with a more pronounced point, and there is no blade belly.
Rescue: a knife with a window breaker and seat belt cutter on the pommel.
Serrated: Saw-like teeth on part or all of the blade edge.
Sheepsfoot: A rounded, dull tip and a flat edge, this blade type is bit of a combination of tanto and drop point, and vaguely resembles a small hoof in shape.
Spear Point: A blade where both sides have a sharp edge
Tanto Blade: A sharply angled blade style.
Trailing Point: A blade that curves upward along its spine.
Wharncliffe: A blade with a spine that gently rises as it nears the handle of the knife
Anatomy of a Knife
Here we’ll take a look at the anatomy of a knife and what the different terms mean. For more on the different kinds of knives, see Types of Knives
Terminology:
Bevel – A flat expanse that runs from the spine to the belly of the blade
Blade belly – The area of the knife just above edge.
Bolster – Metal knobs situated on either end of a folding knife
Butt – The end of the handle, opposite the point.
Choil – The end of a knife’s cutting edge on the handle side
Edge – The sharp part of the blade
Guard – Projections between blade and handle meant to protect your fingers
Point – The tip of the blade
Pommel – A knob on the butt of a knife
Ricasso – A flat expanse between the guard and the belly of the blade.
Serration – Saw-like teeth
Spine – The thickest part of the blade, usually opposite the edge
Swage – An edge opposite the primary edge
Tang – The part of a blade where it joins or is held by the handle. “Full Tang” means the tang goes all the way through the handle
Thumb Grip – A projection on the blade to assist in opening a folding knife
Safety Tips
Here are some safety tips for your knife. This is a great place to start if you are new to carrying a pocket knife, using a hunting knife, or both.
- When cutting, always cut AWAY from your body, not towards. One of the easiest ways to injure yourself opening a package.
- If you drop your knife, it’s best to let it fall. You might catch the wrong part of the blade and cut yourself. Just don’t let it hit your toes, either!
- Hand the knife to someone handle first. Giving it to your friend or loved one with the blade facing out is not only rude, it’s also dangerous.
- Keep your knife folded up and/or sheathed when you’re done with it. This is easy to remember with a big knife, harder to remember with a keychain knife, but they can both cut deep.
- Keep your knife clean, oiled, and sharp. A properly working knife is always safest.
- Speaking of… discard it, retire it, or get it fixed if something breaks. Sometimes the manufacturer will fix it for you, if it’s covered under warranty. If not, there are specialists who can fix a broken knife for you if you don’t know how to do it yourself. They will also sharpen the blade for you. (Look up “knife repair” in a search engine online to find options in your area)
- Knives are like scissors in that you shouldn’t run with them in your hand.
- Don’t use a knife on electronics until you’ve made sure they’re unplugged and/or the batteries are out.
Recommended Resources for Further Learning
- Spyderco Edge-U-Cation – in depth articles and pictures of various types of edges, clips, different types of steels used in Spyderco knives
- Care for your Buck Knife – A quick guide by Buck to caring for your knife
- Safe Knife Use by Gerber – Safety Tips by Gerber
- American Knife and Tool Institute – More safety tips and other information, also has pages on introducing young people to knife use.